Developing applications on the Force.com platform is easy, straightforward, and highly productive. A developer can define application components, such as custom objects and fields, workflow rules, Visualforce pages, and Apex classes and triggers, using the point-and-click tools of the Web interface. Simple changes can be implemented and deployed immediately without affecting other users in the production organization. More complex features can be left in development status until they have been fully tested, and then deployed to everyone in the production organization.
But how do those same development practices work when building a large-scale enterprise application in collaboration with several other developers? When developing complex applications with highly customized logic and user interfaces, configuring on-the-fly in a single environment no longer makes sense. Such applications take time to develop, and require more formal practices to ensure they work as intended and meet users’ needs.
There’s also a lot of middle ground. Your project might not seem all that large, and perhaps you’re doing the development by yourself along with day-to-day administration tasks. You can still benefit from using a sandbox as a development environment—a place where you can develop customizations and code without affecting end users. More traditional project-based development opens up new possibilities for Force.comdevelopment, but also requires new processes for development, migration, and synchronization.
Whether you are an architect, administrator, developer, or manager, this guide prepares you to undertake the development and release of applications on the Force.com platform. It starts with the most basic scenario, using a developer sandbox and change sets. Later chapters address other development environments, tools, and processes for more complex enterprise scenarios.
Developing in a Production Organization
The easiest way to develop new functionality is to customize a production organization using the Salesforce Web user interface. You can develop new objects and applications using declarative tools that are powerful and easy to use. In this scenario, all of the development occurs on the production organization, so there is no need for separate development or testing environments. While this process is the fastest way to complete a circuit of the development lifecycle, you are limited in what you can accomplish. For example, you can’t write Apex code directly in a production organization.
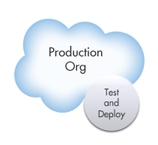
Typical development lifecycle:
- Plan functional requirements.
- Develop using Salesforce Web tools, using profiles to hide your changes until they’re ready to deploy.
- Update profiles to reveal your changes to the appropriate users.
- Notify end users of changes.
A single administrator can effectively develop new dashboards, reports, and email templates or add new custom fields to existing objects this way. However, when development is more complex and multiple team members are involved, a more formal application lifecycle scenario is appropriate.
Developing with Sandbox
For development tasks that are slightly more complex or that must be isolated from the production organization, you can use a separate development environment, usually a sandbox. In this scenario, all of the development and testing occurs in the development environment, and then the changes are promoted to the production organization.
If you are simultaneously developing projects in production and sandbox organizations, consider tracking setup changes you make in the production organization and replicating them in the sandbox. This is important because if your sandbox has out-of-date customizations, you might inadvertently replace your newer changes in production with these older customizations when promoting them from sandbox.
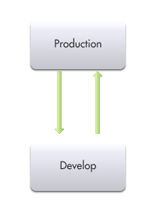
Typical development lifecycle:
- Create a development environment.
- Develop using Salesforce Web and local tools.
- Test within the development environment.
- Replicate production changes in the development environment.
- Deploy what you’ve developed to your production organization.
Typical development projects:
- New custom objects, tabs, and applications
- Integrations with other systems
- Apps involving Apex, Visualforce, workflow, or new validation rules
About Sandbox Organizations
A sandbox is a copy of your production organization. Sandboxes contain the same metadata—which is configuration information such as the types of custom objects and fields, applications, and workflows—as your production organization. That metadata, as well as data in the case of a full sandbox, is copied to a new organization, isolated from your production organization. Operations you perform in your sandbox don’t affect your production organization.
Sandboxes are available in Enterprise, Unlimited, and PerformanceEditions. With Unlimited and Performance Edition, you can create multiple sandbox copies of different types. Use sandboxes for development, testing, training, or other purposes without compromising the data and applications in your Salesforce production organization. Each sandbox instance is isolated from every other sandbox instance, just as they are from production.
About Migrating Changes between Organizations
The easiest way to send configuration changes from one organization to another is to use a change set. To send customizations from your current organization to another organization, you create an outbound change set. Once you send the change set, the receiving organization sees it as an inbound change set.
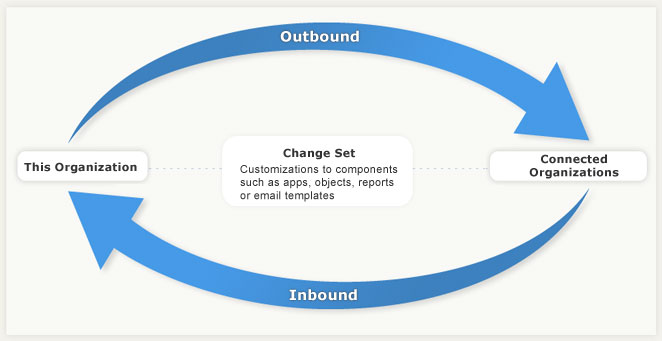
Change sets can only contain changes that you can make through the Setup menu, and they don’t support every type of component that can be customized. You also can’t use change sets to rename or delete a component. If you make changes that aren’t supported by a change set, you can migrate them manually by repeating the steps you performed in the other organization. For more information about components available in change sets, see the Salesforce online help.
Some components are dependent on other components. For example, the custom fields of a custom object rely on the existence of that custom object. If you try to migrate those custom fields to an organization that doesn’t contain the custom object upon which they’re dependent, the deployment will fail. When you create a change set, it’s easy to view and add the dependencies to ensure all the necessary components are migrated.
Sending a change set between two organizations requires a deployment connection. Change sets can only be sent between organizations that are affiliated with a production organization. For example, a production organization and a sandbox, or twosandboxes created from the same organization can send or receive change sets.
A deployment connection alone doesn’t enable change sets to be sent between organizations. Each organization must be authorized to send and receive change sets. This added level of security enforces code promotion paths and keeps organizations’ setup metadata from being overwritten by mistake.
Quick Start: Using a Sandbox and Change Sets
Follow these steps to create a developer sandbox and migrate configuration changes you make in it to your production organization using a change set.
- Create a Developer Sandbox
- Authorize a Deployment Connection
- Create and Upload an Outbound Change Set
- Validate an Inbound Change Set
- Deploy an Inbound Change Set
Create a Developer Sandbox
Use a developer sandbox to ensure that your changes are isolated from production until you’re ready to deploy them.
Sandboxes are only available in Enterprise, Unlimited, and Performanceeditions.
- From Setup, enter Sandboxes in the Quick Find box, then selectSandboxes.
- Click New Sandbox.
- Enter a name and description for the sandbox.
- Select Developer for the type of sandbox.
- Click Start Copy.The process can take a while, depending on the size of your organization. You’ll receive a notification email when yoursandboxhas completed copying.
- Click the link in the notification email to access your sandbox.
If you’d like to experiment with change sets before using them for a development project, create a test custom object with a custom field in your developer sandbox now. You can practice deploying these customizations in the next steps, and delete them when you’re finished.
Authorize a Deployment Connection
Before you can receive change sets from a sandbox or other organization, authorize a deployment connection in the organization that receives the changes.
- Log into the organization that’ll receive inbound change sets. Usually this is the production organization associated with your sandbox.
- From Setup, enter Deployment in the Quick Find box, then selectDeployment Settings.
- Click Edit next to the organization from which you want to receive outbound change sets. Usually this is your sandbox.
- Select Allow Inbound Changes and click Save.
Create and Upload an Outbound Change Set
Typically, you create an outbound change set in a sandbox organization and deploy it to production. But depending on your development lifecycle, you might choose to migrate changes in either direction between related organizations.
- From Setup, enter Outbound Change Sets in the Quick Find box, then select Outbound Change Sets.
- Click New.
- Enter a name for your change set and click Save.
- In the Change Set Components section, click Add.
- Choose the type of component (for example, Custom Object or Custom Field), the components you want to add, and clickAdd To Change Set.If you are experimenting with a test custom object and custom field, try adding just one of them to the change set first.
- Click View/Add Dependencies to see whether the components you’ve added to the change set are dependent on other customizations.In the case of the test custom object and custom field, the related component and page layout will both be listed.
- Select the dependent components you want to add and click Add To Change Set.
- Click Upload and choose your target organization.The outbound change set detail page displays a message and you get an email notification when the upload is complete.
Now log into the target organization, where you can see the inbound change set.
Validate an Inbound Change Set
Validating a change set allows you to see the success or failure messages without committing the changes.
- From Setup, enter Inbound Change Sets in the Quick Find box, then select Inbound Change Sets.
- Click the name of a change set.
- Click Validate.
- After the validation completes, click View Results.If you receive any error messages, resolve them before you deploy. The most common causes of errors are dependent components that aren’t included in the change set and Apex test failures.
Deploy an Inbound Change Set
Deploying a change set commits the changes it contains to the target organization.
- From Setup, enter Inbound Change Sets in the Quick Find box, then select Inbound Change Sets.
- In the Change Sets Awaiting Deployment list, click the name of the change set you want to deploy.
- Click Deploy.A change set is deployed in a single transaction. If the deployment is unable to complete for any reason, the entire transaction is rolled back. After a deployment completes successfully, all changes are committed to your organization and the deployment can’t be rolled back.
Development Environments
Developing on the Force.com platform requires a development environment, a place where you can work without affecting other users. In traditional software development, a development environment is little more than a space to call your own, but on theForce.com platform, each development environment is its own fully functional Salesforceorganization.
In Quick Start: Using a Sandbox and Change Sets, we used a single development environment, a developer sandbox, to make changes isolated from the production organization. In more complex scenarios, you might have multiple environments for various purposes, such as development, integration, testing, and training. There are also different types of development environments best suited for different uses.
When using a single development environment for development and testing, you must stop development to test, and you can only resume development after you deploy. Unless you have a single developer doing all of these tasks, this can be an inefficient use of resources. A more sophisticated development model allows development to continue while testing and deployment take place. In this case you need two isolated environments, one for development and one for testing.
Isolating Development and Testing
Having separate development and test environments increases the complexity of the development process, and introduces a question: where do changes to existing components take place? For example, imagine you have an application you developed and then migrate those changes to your testing environment. During testing, you find that some changes need to take place to deploy to production. Do you make those changes in the testing environment or go back to your development organization and start the process again? If you only have two sandboxes, you might want to make those changes in your testing organization, because this is a faster and easier process, and your development sandbox might have already changed to the point where you can’t start over easily. However, you will still want to replicate any changes made in your test environment back to your development environment, to ensure the next time you promote from development to test that the fix is retained. The arrangement and flow of the application development process is shown in the following image:
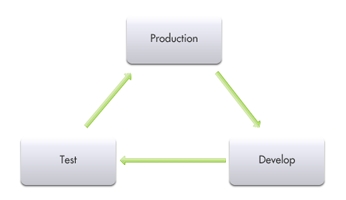
Typical development lifecycle:
- Create a development environment.
- Develop using Salesforce Web and local tools.
- Create a testing environment.
- Migrate changes from development environment to testing environment.
- Test.
- Replicate production changes in other environments.
- Deploy what you’ve developed to your production organization.
Typical development projects:
- New custom objects, tabs, and applications
- Integrations with other systems
- Apps involving workflow or new validation rules
Developing Multiple Projects with Integration, Testing, and Staging
If you have multiple developers and more than one project in development that will be released at the same time, you need integration testing to make sure that the separate code lines can be merged without conflict. In the future, you might want to include user-acceptance testing (UAT) to determine if the original design requirements are met. A more elaborate development process can also contain a staging environment where you ensure that the deployment to production goes exactly as planned.
In such a development scenario, you might wonder where to make changes to the code line. If a feature fails any test on the way towards production deployment, do you fix the feature in the organization where it failed, or start the entire process over again? As the complexity of your application development process increases, you will find that fixing things as you go is not a good model. Instead, you will want to make all fixes in a development organization and follow a repeatable process for migrating that change toward production. The following image depicts this process:
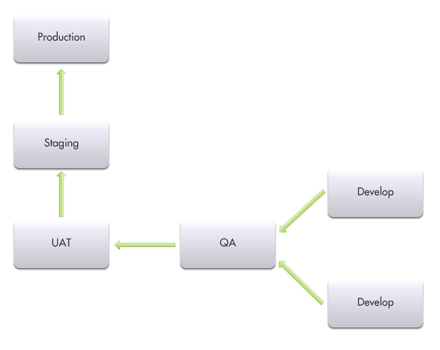
Typical development lifecycle:
- Create development environments.
- Develop using Salesforce Web and local tools.
- Create testing environments, including UAT and integration.
- Migrate changes from development environment to integration environment.
- Test.
- Migrate changes from integration environment to UAT environment.
- Perform user-acceptance tests.
- Migrate changes from UAT environment to staging environment.
- Replicate production changes in staging environment.
- Schedule the release.
Typical development projects:
- Concurrent development of new applications in multiple environments
- Projects that require team development
About Types of Development Environments
There are two types of development environments: sandbox organizations and Developer Edition organizations.
Sandboxes are new organizations copied from your production organization. There are different types of sandboxes suitable for different uses.
| Sandbox type | Description |
|---|---|
| Developer | Developer sandboxes copy customization (metadata), but don’t copy production data, into a separate environment for coding and testing. |
| Developer Pro | Developer Pro sandboxes copy customization (metadata), but don’t copy production data, into a separate environment for coding and testing. Developer Pro has more storage than a Developer sandbox. It includes a number of Developer sandboxes, depending on the edition of your production organization. |
| Partial Copy | A Partial Copy sandbox is a Developer sandbox plus the data that you define in a sandbox template. |
| Full | Full sandboxes copy your entire production organization and all its data, including standard and custom object records, documents, and attachments. Use the sandbox to code and test changes, and to train your team about the changes. You can refresh a Full sandbox every 29 days. |
A sandbox can also contain some, none, or all of your production data, depending on the intended use. For development, you might only need a small set of data to make sure things work. For QA testing, especially regression testing, you need a large set of data that does not change over time. For pre-deployment staging, you need a sandbox that is as close to your production environment as possible, including the data. Only full sandboxes copy your data when they’re created, but you can use the Import Wizard or Data Loader to add data to a sandbox.
Another type of development environment available on the Force.complatform is a Developer Edition organization. Developer Edition provides free access to many of the exclusive features available with Enterprise, Unlimited, and Performance Editions. You get full access to the Force.com platform and API, so that you can extend Salesforce, integrate with other applications, and develop new tools and applications. Developer Edition organizations are used primarily by independent software vendors (ISVs) creating applications for distribution on AppExchange. See the ISVforce Guide for more information.
Sandbox Uses
If you have multiple sandboxes available for your organization, take the following factors into account when planning which ones to use for what purposes.
| Use | Type of Sandbox | Notes |
|---|---|---|
| Development | Developer orDeveloper Prosandbox | Full sandboxes are more costly in terms of create and refresh time, and would also give developers access to data that might not be appropriate. |
| Testing |
| |
| Testing external integrations | Full sandbox is best when an external system expects full production data to be present. | Partial Copy sandboxes may be appropriate in special cases when you want to use sample data or a subset of your actual data. Works well if you’re using external IDs. |
| Staging and user-acceptance testing | Full sandbox is best for validation of new applications against production configuration and data. | Partial Copy sandboxes are appropriate if testing against a subset of production data is acceptable, for example, for regional tests. |
| Production debugging | Full sandbox |
Sandbox Considerations and Limitations
Sandbox functionality is not identical to production, and you’ll need to plan for the differences as well as for the copy process itself.
Consider the following when creating or refreshing a sandbox:
- Creating or refreshing a sandbox copy is a long-running operation that might complete in minutes, days, or even more than a week. Several conditions factor into the duration, including the number of customizations, data size and configuration (for full copies), numbers of objects, and server load. Also, sandbox refreshes are queued, so your requested copy might not start immediately after your request. So plan ahead, and accept the default minimums for optional data in a full sandbox whenever possible.
- Refreshing a sandbox deletes and recreates the sandbox as a new copy of the production organization. In effect, this reverses any manual access changes you have performed. If you created users in a sandbox, they no longer exist; if you changed a user’s permissions and access settings, those revert to their values in the production organization. This means that after a refresh, any access changes you performed must be repeated in the new copy. To avoid this process, you can create user templates in your production organization, and then activate them in the sandbox organization.
- Setup and data changes to your production organization during the sandbox creation and refresh operations might result in inconsistencies in your sandbox. Therefore, it’s best to freeze or minimize changes to your production organization while creating or refreshing a sandbox.
The following features are disabled and cannot be enabled in sandboxes:
- Contract expiration warnings
- Case escalationContract expiration warnings and case escalation are disabled because they automatically send email to contacts, customers, and production organization users.
- Subscription summary
- Data exports (by clicking Export Now or Schedule Export on the Weekly Export Service page in Setup)
- The ability to create Salesforce sandboxes
- The ability to copy email service addresses that you create in your sandbox to your production organization
- The ability to publish Site.com sites
Creating a Development Sandbox
After you have determined the type of development environment you need for a particular project or task, create a sandbox copy of your production organization.
- From Setup, click Sandboxes.
- Click New Sandbox.
- Enter a name and description for the sandbox.
- Select the type of sandbox.
- Click Start Copy.The process can take a while, depending on the size of your organization. You’ll receive a notification email when yoursandboxhas completed copying.
- Click the link in the notification email to access your sandbox.You can log into the sandbox at test.salesforce.com/login.jsp by appending .sandbox_name to your username. For example, if your username for your production organization is user1@acme.com, then your username for a sandbox named “test” is user1@acme.com.test. Your password is the same as it is in production.
- Small changes are made to ensure that the sandbox doesn’t accidentally communicate with the production organization. Before you use the sandbox you created in this trail, be sure to adjust those settings as described in Development Lifecycle Guide (PDF) section “Updating Environmental Dependencies.”
No comments:
Post a Comment